 Yeah – it’s an obsession. This time lapse thing is starting to take over my life.
Tonight,after work, Jose and I headed out to I-95 to shoot another time lapse movie. I wanted to try a busy highway, where streaking tail lights add an interesting blur and really bring the compression of time home.
Jose made two suggestions – places where I-95 ducked under a city street.
The first was in East Haven. We headed over the “Q” Bridge, took a quick look and decided it wouldn’t do. Visual access to the highway was interrupted by a closed on ramp. This shot needed a long visible stretch of road.
Next stop was West Haven. There, Stevens Avenue, a relatively quiet residential street, passes over a straight section of the highway. It’s a few hundred yards from where the West Haven Tolls once stood. There is a cyclone fence on the overpass, but the spaces looked large enough for my 30mm lens to get off a clean shot.
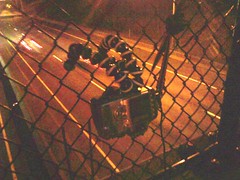 I spent a few minutes trying to thread my Gorillapod through the lattice work to support “Clicky.” No matter what I did, the camera wouldn’t sit correctly for the shot.
Then, Jose recommended I flip it upside down! That solved my problem. A few seconds later, I was ready to shoot.
Make no mistake, it’s unnerving to have your camera hanging upside down on a fence over the Interstate. We took the shoulder strap and tied it to the fence as a safety backup.
I fired off a few test shots. The lights streaked, as I expected. Everything looked good. The camera was set to .a ½ second exposure at f1.4. For low noise, my ISO dialed down to 200.
The intervalometer was plugged in next. It was set to fire a shot every four seconds.
What you see below is the result. Because the camera was upside down, I had to flip this video 180° – pretty easy with Sony Vegas 8… but it would work as well with nearly any editing program.
There is some lens flare, probably from a street lamp, on the right side of the image. I wish I’d seen it before I started shooting. Other than that, I’m pretty happy with the result.
This 10 second clip took around 20 minutes of shooting.
Since I’m still really testing what I can do, here’s another version. The color has been corrected, making blacks ad whites a little closer to reality and the frame a little brighter. I’ve also stretched the time by a factor of approximately two. Vegas 8 creates the extra frames necessary, so the movie continues to render smoothly.